
Pull Request
Let’s take a look at PR workflow.
.github/workflows/pull_request.yml
name: Pull Request Plan
on:
- pull_request
jobs:
run:
runs-on: ubuntu-latest
env:
AWS_ACCESS_KEY_ID: ${{ secrets.AWS_ACCESS_KEY_ID }}
AWS_SECRET_ACCESS_KEY: ${{ secrets.AWS_SECRET_ACCESS_KEY }}
AWS_REGION: us-west-2
GH_TOKEN: ${{ github.token }}
TS_ENV: dev
TS_TOKEN: ${{ secrets.TS_TOKEN }}
# INFRACOST_API_KEY: ${{ secrets.TS_TOKEN }} # needed if using cost estimation
steps:
- name: Checkout
uses: actions/checkout@v3
- name: Install Ruby
uses: ruby/setup-ruby@v1
with:
ruby-version: 3.1
bundler-cache: true # runs 'bundle install' and caches installed gems automatically
- name: Install
run:
.github/bin/install
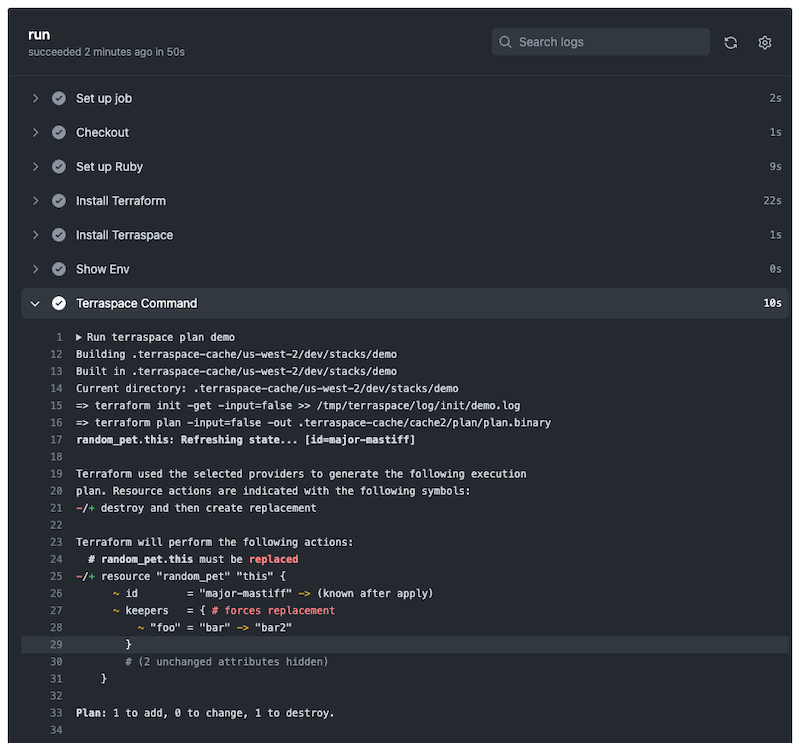
- name: Terraspace Command
run: |
terraspace plan demo
The difference here is that this workflow only runs on pull_request events and will run a terraspace plan.
Create Branch and PR
git checkout feature1
vim app/stacks/demo/main.tf
git add .
git commit -m "change code"
git push -u origin feature1
To create a Pull Request, you can either go to the url printed out from git push
https://github.com/ORG/REPO/pull/new/feature1
Or go to the branch on GitHub and click “New Pull Request”. Click “Create pull request”. A Pull Request Plan / run should start immediately. You should see something like this:
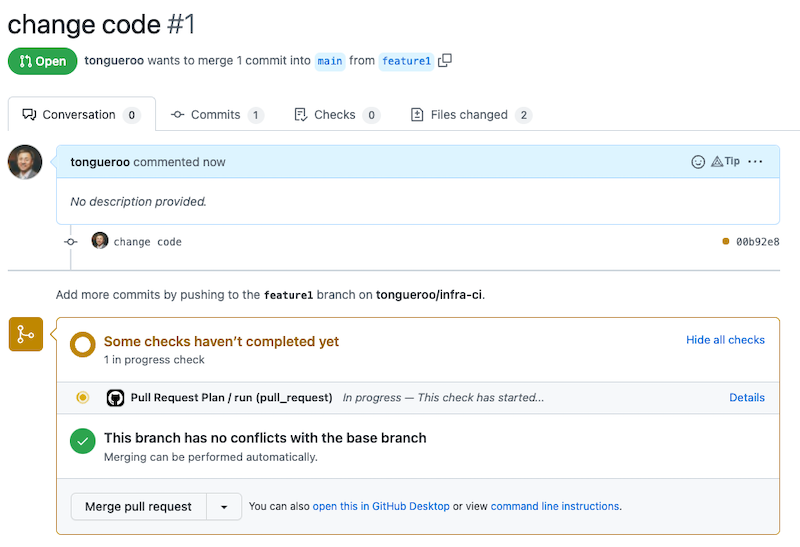
Logging Details
You can click on the Details to see the Workflow Logging output.
A plan was run and provided a preview of what would happen. Any additional git push to the PR branch will provide updated previews.
If you merge the PR, the Push Workflow that we covered earlier will automatically apply the preview.
Next, we’ll cover the manual workflow dispatch.


